


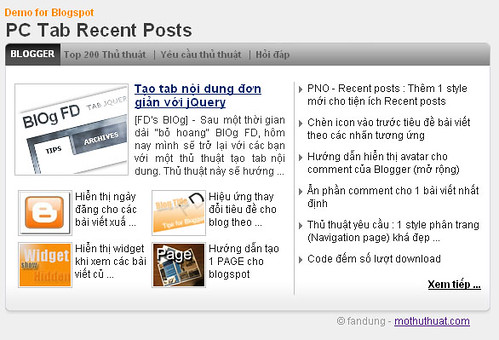
Tiếp tục là 1 giao diện mới cho tiện ích recent posts, hôm nay theo yêu cầu của bạn thienthan mình sẽ giới thiệu cho các bạn 1 dạng mới, dạng này nó cũng gần giống như dạng hiển thị bài viết giống trang news.zing.vn Vì là tiện ích quá quen thuộc nên mình sẽ không hướng dẫn chi tiết.
Hình ảnh minh họa
* Các bước thực hiện :
1. Vào bố cục
2. Vào phần tử trang
3. Tạo 1 widget HTML/javascript rồi dán code bên dưới vào:
<link href="http://data.fandung.com/blog/demo/PCtab-recentposts/style.css" rel="stylesheet" type="text/css" />
<style type="text/css">
.top-left
{
background-image:url(http://data.fandung.com/blog/demo/PCtab-recentposts/gray-box-top.png);
background-repeat:repeat-x;
background-position:right center;
height:29px;
}
.top-right
{
background-image:url(http://data.fandung.com/blog/demo/PCtab-recentposts/gray-box-top.png);
background-repeat:repeat-x;
background-position:left center;
margin-right:5px;
height:28px;
padding-top:1px;
}
.bottom-left
{
margin:0;
padding:0;
vertical-align:top;
background-image:url(http://data.fandung.com/blog/demo/PCtab-recentposts/red-box-bottom.png);
background-repeat:repeat-x;
background-position:left top;
height:8px;
}
.bottom-right
{
margin:0;
padding:0;
vertical-align:top;
background-image:url(http://data.fandung.com/blog/demo/PCtab-recentposts/red-box-bottom.png);
background-repeat:repeat-x;
background-position:right top;
height:8px;
margin-left:10px;
}
</style>
<div class="article-list-tabbed-box">
<div class="top-left">
<div class="top-right" style="padding-left: 7px;">
<div style="float: left; margin-right: 4px; font-size: 11px;cursor: pointer; font-weight: bold" class="is-section"> Blogger</div>
<div class="sc_menu" style="float: left; overflow-x: hidden; overflow-y: hidden; ">
<ul class="tab-header sc_menu">
<li class="tab-name" ><a href="#">Top 200 Thủ thuật</a></li>
<li class="sep">|</li>
<li class="tab-name" ><a href="#">Yêu cầu thủ thuật</a></li>
<li class="sep">|</li>
<li class="tab-name"><a href="#">Hỏi đáp</a></li>
</ul>
</div>
<div style="clear: both"></div>
</div>
</div>
<div style="clear: both;" class="zone">
<script type="text/javascript">
home_page = "http://www.fandung.com/";
label = "Thu%20Thuat%20Blog";
numposts = 11;
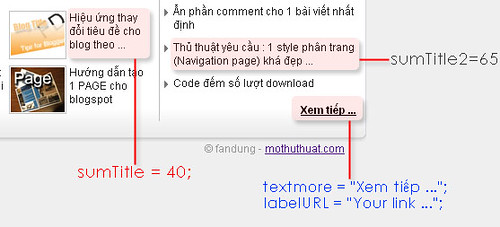
sumTitle = 40;
sumTitle2 = 65;
sumPosts = 151;
textmore = "Xem tiếp ...";
labelURL = "http://www.fandung.com/search/label/Thu%20Thuat%20Blog?max-results=10";
</script>
<script type="text/javascript" src="http://dinh-thuong-code.googlecode.com/files/rc-post-PC.js"></script>
</div>
<div class="bottom-left"><div class="bottom-right"></div></div>
</div>- Nếu muốn hiển thị cho cả blog thì dùng file js bên dưới :http://dinh-thuong-code.googlecode.com/files/rc-post-PC-all.js4. Save widget.
- Hình ảnh minh họa bên dưới sẽ giúp các bạn dễ điều chỉnh các biến hơn:
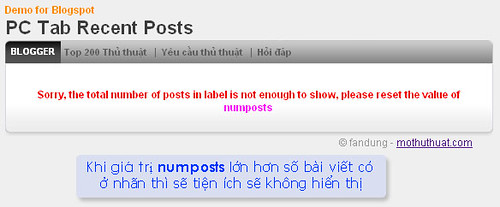
- Một chú ý nhỏ, nếu số bài viết bạn muốn hiển thị lớn hơn số bài viết có ở 1 nhãn thì tiện ích sẽ không hiển thị. Ví dụ 1 nhãn tên “Label1” hiện có 7 bài viết, nhưng giá trị numposts bạn set là 8 thì tiện ích sẽ không hiển thị, khi đó bạn phải thay đổi lại giá trị numposts thành 7 hoặc nhỏ hơn. Lưu ý, giá trị numpost không được nhỏ hơn 5.
Chúc các bạn thành công.


 Từ Khóa:


0 nhận xét:
Đăng nhận xét